Body Work (Coach building)
Classic cars with separate chassis rails would be removed from the chassis so that further inspection and restoration work can be carried out. The problem with this type of body is that they are usually quite flimsy and once removed from the chassis, no single panel will remain lined up. A lot of care and thought needs to go into the restoration of this kind and the body may need to return to the chassis a number of times before it is completed.
A monocoque classic car may require to be affixed to a building bench to check for any structural damage. The often-rusted areas are floors, sill panels, boot floors and chassis rails. If this is the case, a lot of panels will need to be removed and replaced, the car must be jigged to ensure it stays true and correct to its original shape when it is welded back together.
A quick and easy lesson about rust… it’s always worse than it looks! When classic cars were welded together in the factory, remember they were only built to last a short time and many shortcuts we’re taken to keep their profit margins healthy. When cars were spot-welded together there was never any thought about rust preventatives or weld through primers. There was no fish oiling of cavities to decrease the risk of rust between the welded seams or within enclosed box sections. So, the areas that you cannot see have usually started to rust from the inside out, therefore, if you see a little rust on the outside there is probably a hell of a lot more to be discovered on the inside of a cavity section or seam weld.
Bolt on panel skins and spot welded seems are often swollen as the rust between the metals grows greater and greater over the years. If you’ve ever removed a door skin or unpicked some spot welds to remove a panel you would certainly see that some of the worst rust is between the seams.
The decision on how far to go restoring a body shell of a classic car must also consider another factor, how long do we want this car to survive before it is requiring restoration again. The option to just patch what you see and not worry about what you can’t see is the cheap and quick decision that will almost certainly sting you sooner rather than later. The restoration is still going to be a costly exercise, however, the added insurance for the car to last many decades by doing it right the first time, is where we give our recommendation.
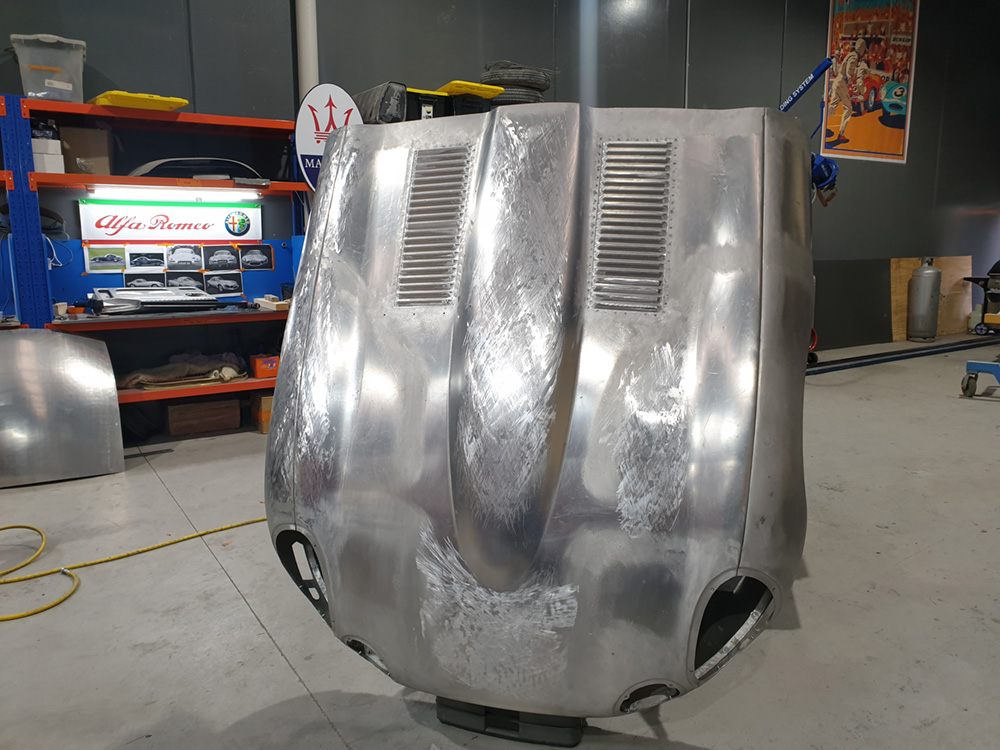
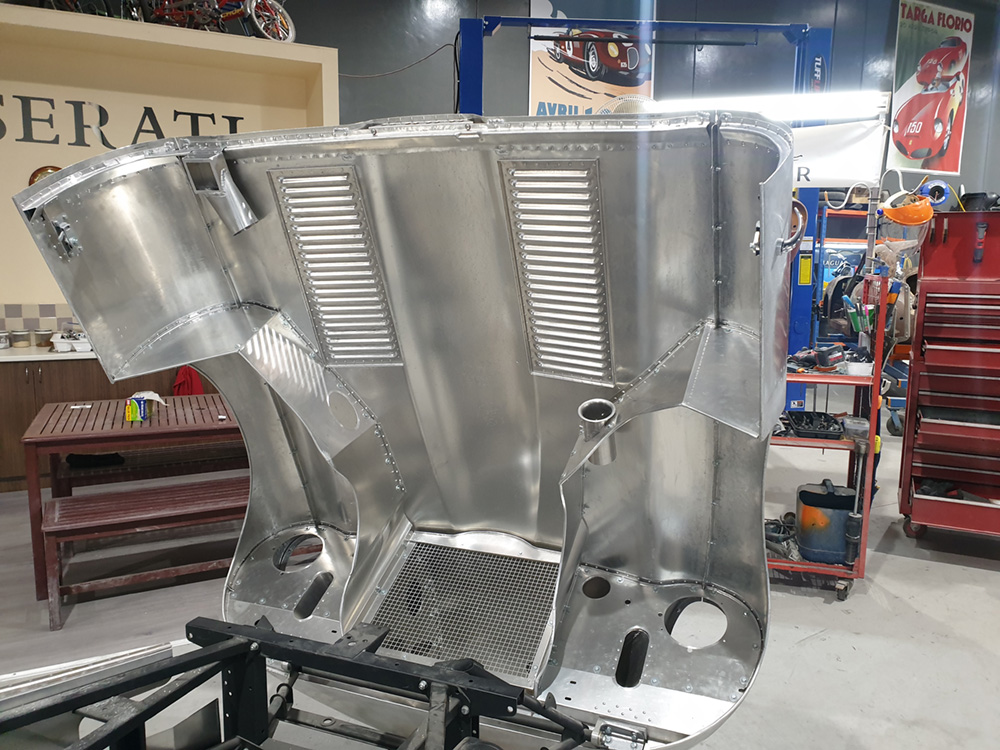
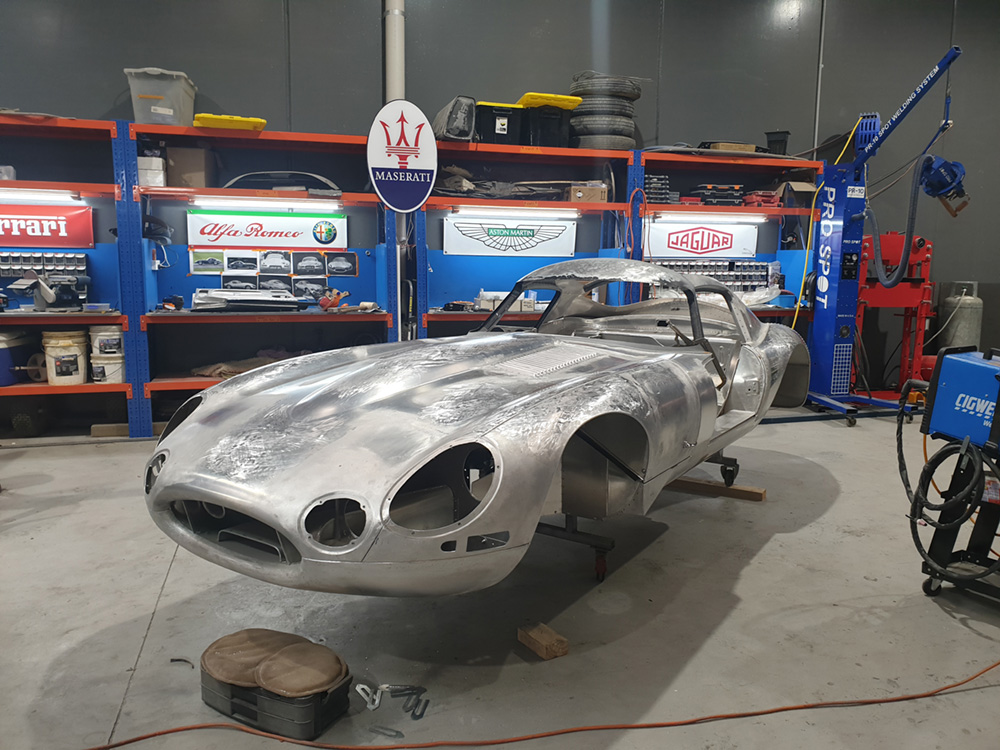
On average an estimated 200+ panels are in a body shell, now let’s remember that every one of them is welded to the next, one way or another. Each and every one of these panels has to be assessed and a decision made on repair or change. A repair may entail fabricating a new section that can be fusion welded in place matching all folds and contours of the existing panel. The decision to change a panel would be to fabricate an entire new panel, unpick the spot-welds of the original and spot-weld the new one in place in its entirety. Remembering if this path is chosen, all of the spot-welded areas that would have had swelling rust between them have now been accessible and addressed. Before spot-welding new panels on today in restoration, we spray weld through primers to both sides of the panel before spot-welding. This is proven to be the most successful prevention against rust in these areas of a body shell.
Classic cars that has been around for many decades will experience vast differences in the amount of rust within the body shell. Some cars may have been garaged all their life and others seem to have spent some months of their life as deck cargo on a submarine. In many cases, minor repairs to affected panels and substructures is all that is required, but for the deck cargo chariots, sometimes the better choice is to fabricate a brand-new body.
When mentioned to people admiring one of our finished, restored cars, that we built a brand-new body for it, they often look at you with a quite questionable expression on their face. Some people cannot comprehend that an entire body can be built by hand and be as good or even better than the original. I guarantee that one of our brand-new body shells will outlive any original body shell simply because of the measures taken to ensure its longevity. When looking at a poor condition classic car that is had a hard life, I’ve often heard a comment wouldn’t it be great to have a time machine to go back in time and buy a brand-new one, Well that is still possible, even without the help of Doc. Brown, Michael J Fox and an over the top DeLorean.
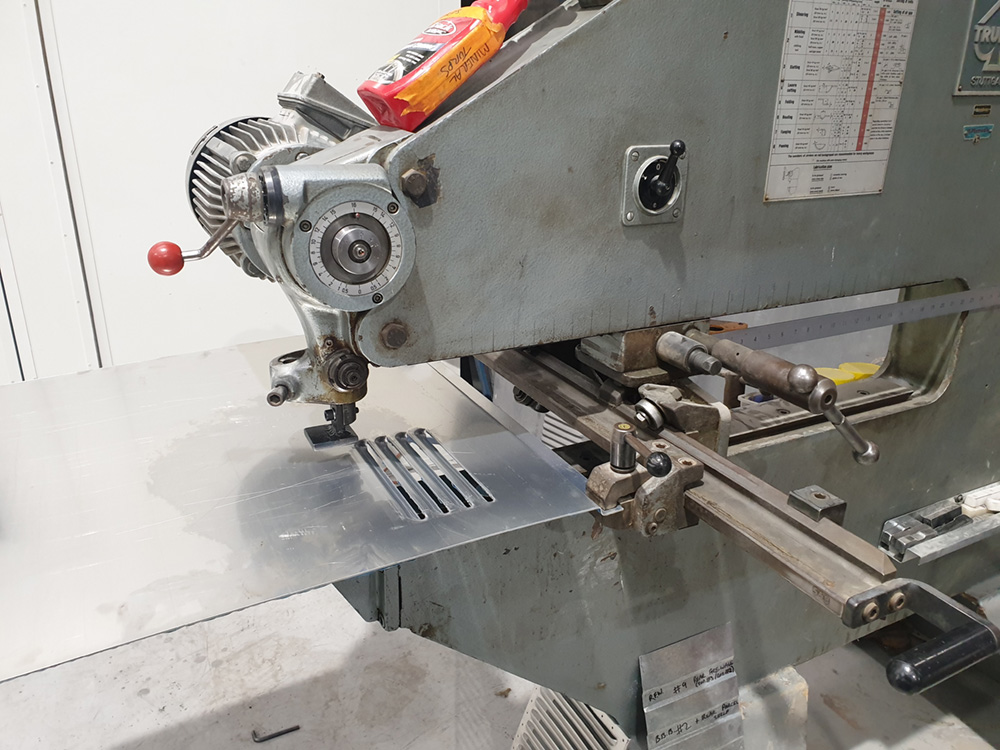
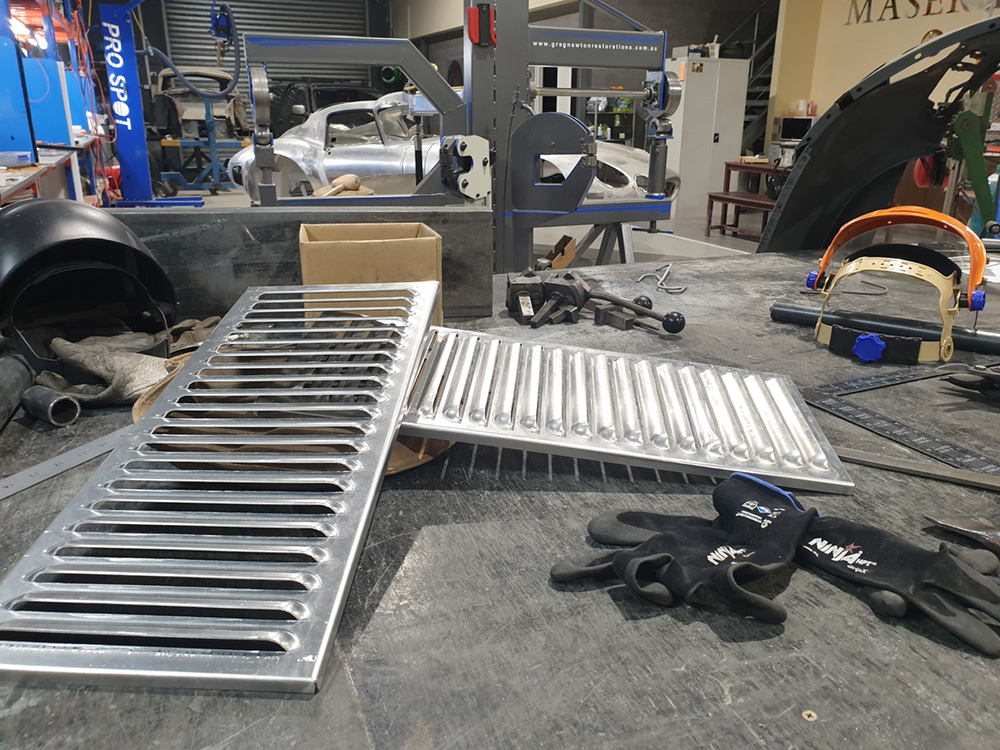
Getting back to fabricating panel sections that will go on to be welded into existing panels that will stay attached to the body, we use a method of welding that is called fusion welding. This is where the new panel section is cut to fit perfectly in within the existing panel leaving no gap. The two metals, new and old, are then melted together using an oxy-acetylene welding torch. We don't use any filler rod unless needed. If a filler rod is required, we only use mild steel non-coated 1.6 mm wire. The reason for this is because it is simply mild steel and it is the exact same product as the parent material being welded together. In sheet metal and outer skins of cars we have to consider expansion and contraction of the metal. From the middle of a hot day to the coldest point of night the sheet metal can expand or contract up to 3%. This being said, different metals, bronzes and coppers used as filler rods expand and contract at different rates therefore often leaving a visual line in the finished paint work after a period of time. Fusion welding with the oxy-acetylene welding torch and planishing while it is hot eliminates this problem completely, you can shrink it back in shape and remove the weld crevice leaving it ready for metal finishing. Another benefit of this form of welding is that is virtually undetectable from either side of the panel.
Before welding closed any box sections within the body shell, it is imperative to sand, prep and clean all welds and prime with a good quality etch primer or surfacer. These areas need to be considered with measures knowing they will be closed for hopefully 100 years or more, remembering once again, this is an area that factory never addressed.
During the metal work stage on a car, it is best if your work can be executed and it looks like you were never there. In other words, a perfect factory authentic look from every angle. This is a type of restoration work that proves itself to be award-winning and most importantly, creating longevity to the repair. To simply put a patch over the top of some rust or even weld a larger patch over the area and lap join it to the original panel, would only escalate another situation of corrosion in yet another panel join.
Lead filler was used in specific areas by the manufacturers for specific reasons and for the restorers who suggests that body filler is better than lead in these areas, I can only suggest to them, maybe they should understand it little further. Lead filler was used for a few different reasons, exterior panel joints and panel gaps. In some cases where two panels joined the exterior of the car, it was not possible to spot-weld the two panels together as it will leave a seam that does not coincide with the flowing lines and design of the vehicle. These two panels may be joined with another form of welding like MIG welding or Brazing. Often these areas would not be welded all the way through the joint and air gaps were left open between one side of the panel and the other. A common point might be a rocker panel to a wheel arch, where the manufacturer would weld the corners and leave the joint for lead filling. Lead is metal and moisture cannot travel through it, therefore, it is the perfect product to seal a joint. If body filler was used in this instance the moisture from the inside of the wheel arch would travel through the porous filler and start attacking the underside of the primers and paint work. The filler will also stay wet for long periods of time and expand, pushing away from the metal and causing a large bubble, furthermore, good old-fashioned rust is back and attacking the metal again.
Another fact about lead filler is that it will never rust. The metal can rust around it but the lead itself, impossible. The only time lead can fail is when it is human error and it is not put in correctly, causing delamination. This would be noticeable straight away by the person putting the lead in or the person preparing to paint over it.
Hinged body panel gapping was another area where lead filler was commonly used in classic sports car manufacturing. This was due to the fact that many of the cars were handmade and panels sometimes just didn’t fit too well and it was left to lead to be the material to fill gaps, create a radius and clearance to the next panel. This also allowed for production time to speed up a little within the body manufacturing stage.
We always remove lead from every single classic car that we restore, not because the lead is no good any more, it is simply because we need to inspect the metal underneath. Hundreds of times I have removed lead filler from cars only the find the lead to be in perfect condition as well as the metal supporting it. We will always replace original lead with new real lead. (Not Fake Lead) It is not easy for everyone to grasp the art of Lead filling and I still can’t read a book while I do it, but after hundreds of cars and taking all the necessary safety precautions I find it the only way to do this job properly.
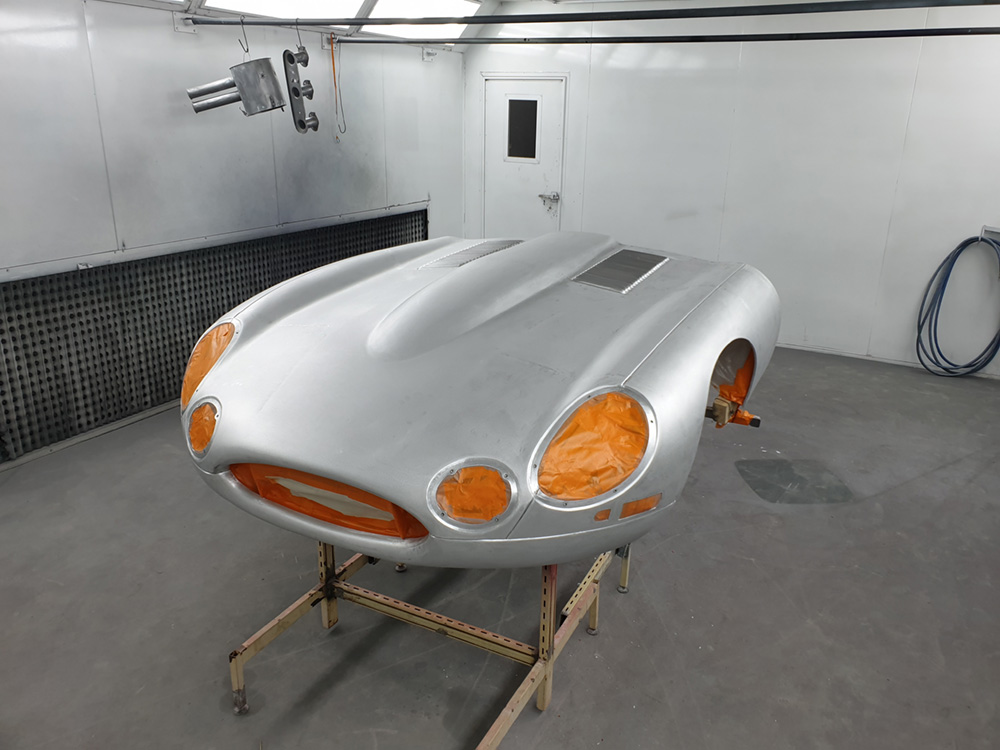
Fit and finish of opening panels is one of the very first qualities noticed when someone walks up to a restored classic car. If you go to classic a car Concours you will commonly notice the vehicle awarded a gold ribbon for first prize will have excellent fitting panels and gaps. To achieve this goal, it must be addressed during the coach building and metalwork stage. All hinged panels must be fitted with locks, latches and rubbers to insure correct fitting and clearances to the inner panels and inner shut plates. Anything not fitting properly at this stage is not a problem to rectify.
The best time to do all the bright work for the vehicle is during the metal work stage and when the bodywork is completed, the bright work can be finalised too. The bright work can often show metal work deformities to the body shell that need to be corrected prior to paint work. There is obviously no risk of damaging paint at this point in time and if the bodywork requires repair or modification then this is the dedicated time in the restoration process to get it right.
Greg Newton.